

Bebot is a synthesizer played using a touchscreen interface. You can use it as a musical instrument, or just to make sound effects and entertain your friends. It is designed to be fun and intuitive, while also versatile in its range of sounds and playing methods.
The quickest way to get started is by putting this manual aside and just playing around to see what everything does. The demonstration videos at normalware.com are also highly recommended viewing, and provide a good, audiovisual introduction to the application's features. Please note that the videos show a slightly older version of Bebot than the one currently on the App Store, so there may be some minor differences and new features that are not covered in the videos.
This manual is not essential reading, but it may help to give you a better understanding of how Bebot works, and what you can do with it.
Once Bebot has loaded, the first thing you'll see is this screen, showing a cartoon robot with a moving background. This is the playing surface. Touching anywhere on the screen will produce a sound. The pitch of the sound is determined by the horizontal position of your finger on the screen, while the vertical position controls the timbre or volume of the sound (depending on the current mode). Note that you can use up to four fingers at the same time, to play multiple sounds simultaneously.

Try sweeping your finger across the screen, or moving it in circles, and observe the effects that your movements have on the sound and the robot's expression. You may also want to try handing the device to a friend and observing the effect it has on their expression.
The circular icon in the lower-right corner of the playing surface is the Control Panel Button. Double-tap this button (ie, tap it twice in rapid succession) to open the control panel. This is where you can access all the options and features that Bebot has to offer. It can seem daunting at first, but if you experiment with each control one by one, you'll soon get the hang of it all.
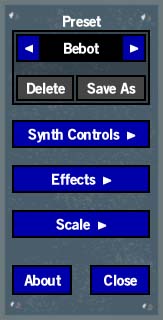
This is the panel that first pops up when you open the control panel. It contains a preset selector, three buttons that take you to other panels, an About button which nobody ever presses, and finally a Close button, which closes the control panel.
Much like any modern synthesizer, Bebot allows you to store useful settings and sounds you've made as presets. It also comes with a collection of inbuilt presets, which demonstrate a few of the application's capabilities.
To load a preset, just tap the arrow buttons on either side of the preset name to cycle through the stored presets. Each preset is loaded automatically as you cycle through the list.
To save a preset, you must first have made some changes to the preset since it was loaded. If no changes have been made, the "Save as" button will appear greyed out. Once you make a change to the settings, the preset name will turn grey to indicate that the preset has unsaved changes, and the "Save as" button will become available. Tapping this button will bring up a keyboard, allowing you to provide a name for the new preset. Giving it the same name as an existing preset will overwrite that preset. A dialog box will appear to confirm this, so you can't do it accidentally. The inbuilt demo presets cannot be overwritten.
To delete a preset, first use the arrow buttons to cycle through to the preset you want to delete, and then tap the "Delete" button. A confirmation box will appear to make sure you meant to tap this button. The inbuilt demo presets cannot be deleted, and the delete button is greyed out when one of these presets is selected.
Any button ending in a right-arrow will take you to a sub-panel. On the main panel, there are three such buttons.
This will take you to the panel where you can edit the tonal characteristics of the sound that the application generates.
This sub-panel lets you apply and tweak the audio effects which modify the sound in interesting ways.
This sub-panel lets you set up the playing surface so that it functions like a keyboard or slide guitar, allowing you to lock into user-programmable musical scales and "zoom in" to different pitch ranges.
An explanation of each of these sub-panels follows.
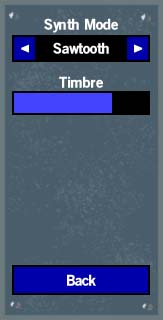
The Synth Controls sub-panel is slightly unusual in that the controls that appear on it change depending on the Synth Mode that is currently selected. This is because each mode represents a different method that can be used to generate a sound, so some controls only apply to certain modes. To change the current mode, tap the arrow buttons on either side of the "Synth Mode" selector box. Each mode is explained below.
In this mode, the sound is a sawtooth wave, which sounds like a simple buzz at a certain pitch. A low-pass filter is applied to this sound, and is controlled by the vertical touch position. The Timbre slider controls the effect that the filter has. For people familiar with synthesizers, this controls the resonance of the filter.
This mode generates a pulse wave, also known as a rectangle wave. The Timbre slider works the same as it does in Sawtooth mode.
This mode has an extra slider, to control the pulse width. At its lowest extreme, this will produce a square wave. Increasing this will lengthen the duty cycle, and at its highest extreme will produce a very narrow pulse. You'll be able to hear the difference it makes to the sound by adjusting this slider while playing a sound on the playing surface.
This generates a sine wave. It sounds something like the sound you make when you whistle, or say "ooh". As a sine wave is a single frequency without harmonics (aka partials), there is no lowpass filter in this mode, hence the lack of a Timbre slider. Instead, the vertical position of a touch controls the amplitude (volume) of the sine wave.
Please note that this mode tends to be the most difficult to hear on the internal speaker. Tiny speakers are incapable of producing low frequency sounds at audible volumes, so only higher pitches will be audible in this mode. Plugging in your headphones, or hooking your device up to external speakers, is recommended.
This mode is similar to Pulse mode, but with a different method of control. Instead of controlling the filter, the vertical touch position controls the pulse width. As this means that the touch position has no control over the filter, overall filter controls are provided in the control panel. These are provided in case you wish to filter off the high frequencies produced by this mode, which some people consider to sound somewhat harsh. If you don't want the filter to have any effect, turn the Cutoff slider to maximum (all the way to the right) and the Resonance slider to minimum (all the way to the left).
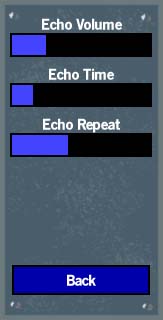
Also known as "delay", this produces repeated copies of the sound, at a certain time interval.
How loud the echo effect should be overall. Turning this right down to minimum will turn off the echo effect completely. Turning it up to maximum will produce an echo matching the volume of the original sound.
This controls the amount of time between the original sound and the echo. This ranges from very short times that can produce a metallic sound, right up to a two-second delay which can be used to make short loops. The most typically 'echo-like' results can be found in the region of about 10% - 30% of this slider's range.
This controls how much of the echo should be fed back to produce another echo. Turning this all the way down will produce just one copy of the sound and no more. Turning it all the way up to maximum will create an infinitely sustaining loop.
Please note that when the Echo Time is at a low setting, the maximum echo repeat is reduced slightly, to minimize any physical harm that could come to you from the people around you, as a result of making irritating feedback sounds. Even so, courtesy and discretion are advised.
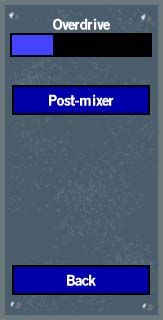
This is a simple form of distortion, in which the sound is boosted in amplitude and then "clipped" back to the output range. This can produce interesting results, as it changes the timbre and harmonic structure of the sound.
In this control panel, the Overdrive slider controls how much of this effect should be applied. Turning this all the way to minimum will turn the overdrive effect off.
The "Post-mixer" button toggles between pre-mixer and post-mixer overdrive. In most cases, you will want this button to be switched off.
When the Post-mixer button is off, each synthesizer voice is distorted independently, before being mixed together. As each voice produces a set of related harmonics, this usually results in a pleasant alteration of the sound and retains the identity of the note being played.
With the Post-mixer button switched on, the synth voices are mixed together before the resulting mix is distorted. If only one voice is playing, the effect will be the same as with the button off. But with two or more voices playing, the voices will be distorted together. This can produce some interesting results, such as power chords for example. However, most of the time, it will result in cacophonous noise. But sometimes that might be just what you want.
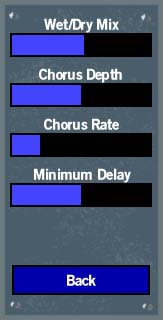
The chorus effect can best be described as a "modulated delay". But since that probably doesn't mean much to anyone who doesn't already know what a chorus effect is, it's not a very effective description. Basically, the chorus effect produces a delayed copy of the sound, but adds vibrato to the copy by continually altering the delay time. It can thicken up your sound by making it sound a bit like there are two of you playing in slightly-detuned unison.
This slider controls how much of the original ("dry") sound comes through, and how much of the effected ("wet") copy of the sound is added. When set to minimum, only the original sound comes through and no chorus effect is applied. When set to maximum, only the effected copy will come through.
For a chorus effect, you would normally want to set the wet/dry slider about halfway, to get an even mix of both. If you turn this slider all the way up, you will instead get just a vibrato effect. You can hear this effect on the "Theremin" demo preset.
This controls how much the delay time should vary. You can consider this the "amount of vibrato" applied to the copy.
This controls how rapidly the delay time should vary. You can think of this as the "vibrato speed" control.
This controls the minimum amount of time between the original and the copy. You can use this to adjust the phasing of the chorus effect. The effect is very subtle.
As well as the vibrato effect, another interesting use of the chorus effect is to put the Wet/Dry Mix at about halfway, but turn the Chorus Rate down very low (even right down to minimum). This produces a slow phasing effect known as a flanger. You can hear this on the "Power PWM" demo preset.
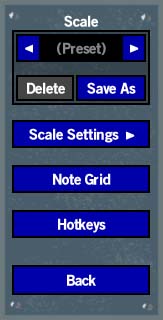
The scale menu contains all of the settings related to playing Bebot in tune as a musical instrument. As well as the default, theremin-like continuous pitch system, you can use the autotune modes to lock in on musical notes. By setting up the user-defined scale to only contain the notes you want, you can make it easy to play in key and avoid wrong notes. You can also zoom in to the pitch range you want to play, and display a grid showing where each note in the scale is, allowing you to play Bebot somewhat like a keyboard. Some of the inbuilt presets demonstrate this functionality.
On the main Scale panel, you will find a preset selector, much like the one on the main panel. This is for loading and saving presets that only affect the settings found in the Scale panel.
It is important to note that main-panel presets also contain their own scale preset. In other words, presets saved in the main panel save the state of all settings, while scale presets affect only the settings in the scale panel. When the selector in the Scale panel shows "(Preset)", as shown in the picture on the right, this indicates that the settings in the scale panel came from the preset loaded in the main panel.
The purpose of having a separate preset selector just for scale options is so that you can apply commonly-used scales to multiple sounds, or multiple scales to any one sound. It may help to think of it as a clipboard for useful scale options, so that you can apply them to other main-screen presets.
For example, let's say you've set up an F minor scale to play along with a particular song in that key. Then you decide you'd like to try playing it with a different sound that you've saved. But when you load the other sound, its scale settings will be loaded along with it.
So, here's how to apply the scale you've set up to an existing main preset. First, save the F minor scale you've set up, as a scale preset. Then, after you've loaded any sound you want to use, you can use the scale preset selector to load the F minor scale back in. You can optionally save this new combination of settings as a main-screen preset, if you think you'll be using it often.
As another example, let's say you want to play a song that changes key from C major to D major halfway through. What you can do in this case is to set up the scales for each key, and save them as two scale presets. During the song, you can switch the scale preset to the other key and continue playing.
This button toggles the note grid display on and off. This is a set of vertical lines that appear on the playing surface, indicating where each note in the scale is. In some cases, the note grid will be a very dense grid of lines, which won't be very useful. But after setting the pitch range and programming a scale (both of which will be covered shortly), the note grid can become very handy.
Once a scale is set up, the note grid can act like the keys on a piano, or the strings on a harp, indicating where to put your finger to play a certain note. The lines in the grid correspond to the coloring of the keys on a keyboard. To help you identify notes and octaves, the lowest note in the current scale is colored differently. If this note is normally white, it will become yellow. If it's normally black, it will become red. This is of particular help when a scale consists of just one color.
Note: It is recommended that you turn the note grid on while you are setting up the pitch range for a scale, so that you can see the effects that your changes are having.

Hitting the "Scale Settings" button will take you to this sub-panel, which is where you set up the pitch range, the autotune mode, and which keys you want to include in the scale. You can think of this as the "scale editor" panel.
The two sliders at the top of this panel control the range of pitches covered by the width of the playing surface. The Pitch slider will move the range up and down, so that you can access higher or lower notes. The Zoom slider focuses in on a narrower range of pitches, which can make it much easier to hit the note you want.
The typical use, when setting up a scale, is to first turn on the Note Grid. Then, use the Zoom slider such that one or two octaves are shown on the screen. Finally, use the Pitch slider to find the octave you want to play in, and to align the root note of the scale near the left edge of the screen. A number of the demo presets are already set up in a similar manner, and it may be easier to start by loading one of them first.
Perhaps the most important thing about setting up Bebot to play a musical scale is to set it to one of the three available autotune modes. These will correct the pitch that you're playing by rounding it to the nearest note in the scale.
The default setting (off) applies no pitch correction. "Snap" mode applies full pitch correction, such that any pitch you play is instantaneously rounded ("snapped") to the nearest note in the scale. In this mode, the only pitches that can be played are those of the notes in the scale (much like on a piano keyboard).
The other two settings, "slow" and "fast" are two versions of the same autotune mode. They are a combination of the continuous-pitch scale, and the "snap" mode. In these modes, wherever you put your finger down, it is rounded to the nearest scale note (like in snap mode). However, moving your finger left or right will produce a continuous pitch-slide. When your finger stops, the pitch correction will then kick in, and round it to the nearest note again.
The difference between these two modes is how quickly the pitch correction will apply this rounding. In fast mode, the pitch will be quickly rounded to the nearest note as soon as your finger is detected to have stopped. In slow mode, the rounding is done at a slower rate, which can produce a more natural-sounding slide as opposed to the slightly artificial (though more stylized) correction of fast mode. Some playing styles will fit one of these modes better than the other.
The area beneath the autotune mode selector is where you can program in which notes you want in the scale. The buttons correspond to the notes in one octave of a piano keyboard. Tap the buttons to toggle them on or off. If a button is lit, that note is in the scale. Note: A scale must contain at least one note.
Back on the Scale panel, this button toggles the hotkeys on or off. The hotkeys are some small buttons that appear in the lower-left corner of the playing surface.
The buttons marked + and - shift the pitch range up or down by one octave. However, please note that they have no effect on sounds that are already playing. Ie, if you are playing a note, and tap these buttons while your finger is still held down, the pitch of the note won't be affected, but any new notes you play (including if you lift that finger and put it back down) will be played in the new octave.
The button marked "S" activates the "snap" autotune mode. This doesn't actually set the autotune mode to snap in the scale settings. Instead, it makes the current autotune mode work like snap mode while the button is lit. This button will not appear if the autotune is already set to snap mode.
You may notice that this button still appears if autotune is switched off, yet it doesn't have any effect. Actually, this is a bug, and will be corrected in the next update.
Most of the technical support requests regarding Bebot are concerning a lack of sound output. The most common cause of this problem is that it is running on an iPhone with the "silent" switch on. This prevents Bebot from using the internal speaker for sound output. Although some other apps are not affected by this, Bebot uses a particular audio mode that allows iPod music to continue playing, which forces it to obey the silent switch.
Although there is now an on-screen message alerting you when the audio is blocked in this way, it is also important to note that there is a second cause for a lack of audio: The volume may be turned down to zero. This is easily overlooked, and may be the last thing you think of when trying to show Bebot to your friends.
Also, when you're trying to use the internal speaker, make sure that you don't have headphones plugged in, and that your finger is not covering the speaker itself (on the iPhone). This is a small hole on the bottom end of the device, and is easily covered by a part of the hand. When covered, very little sound can be heard.
It should also be noted that because of the tiny size of this speaker, it can tend to introduce distortion into the sound. Where possible, it is recommended that you use headphones or plug the device into an external speaker system for significantly improved sound quality.
If you have any other problems, the first thing to try is to exit out of the application and try starting Bebot again. If it still doesn't work, try resetting your device (ie, turning it off and then on again). In rare cases, the device can be left in a slightly unstable state after running some applications, and may exhibit strange behavior. Resetting the device will return it to its normal state, and should make things run smoothly again.
One frequently asked question is: how can you control the iPod's music while Bebot is still running? Actually, there is a setting in the iPhone/iPod Touch's "Settings" app, which lets you pop up a small iPod control window without exiting the current application.
To use this, first run the Settings app, then tap "General", then scroll down and tap on "Home". This lets you assign a function that happens when you double-tap the home button. Set this to "iPod", and if you see an option below that reading "iPod Controls", make sure that is switched on.
Now, if you have music playing (or paused) when you launch Bebot, you'll be able to double-tap the home button to pop up the iPod window without exiting. If you don't have music playing, Bebot will exit and the full-screen iPod browser will launch. Don't worry - after you've selected some music, you can launch Bebot again and your settings will still be just as they were.
Let's say you've decided to incorporate Bebot into some kind of live performance. There are a few things to look out for in this scenario.
Make sure that the batteries are charged up, or even have the device plugged into a charging cable during the performance. Realtime synthesis tends to be fairly heavy on the processor, and despite optimizations to improve battery usage, it is something you'll need to look out for. However, it is not advised that you have the device plugged into the USB port of a computer during a critical time such as a performance, in case iTunes performs a sync, causing the application to quit. The wall-socket USB charging adapter is a preferable choice.
If you're using an iPhone, remember that it's still a phone while Bebot is running. You don't want to receive a phone call while you're performing! So with that in mind, before a performance, you should make sure your iPhone is in "airplane mode". This will disconnect it from the cellular network and prevent it from receiving any calls or messages, as well as any audio interference that may be caused by wireless data transmission. An even better idea is to use an iPod Touch for your performances, as it is easy to forget to turn airplane mode on, with potentially disastrous consequences.
Note: Even though the iPod Touch can't receive phone calls, it still has wireless functions, so airplane mode is still advisable to avoid any potential audio interference.
During a performance, it can be annoying if your device decides to go to sleep and lock itself just before you want to use it. This is especially a problem if you have a passcode lock set. It may be a good idea to set the Auto-Lock time in the settings menu to "Never", to prevent this from happening. However, since this will keep the device running at full power, it is only advisable if you have the device plugged into a charger.
Bebot was developed by Russell Black, and the graphics were made by Lily McDonnell.
For more information, visit normalware.com. If you have any questions or comments, you can contact the developers at bebot@normalware.com